2010-02-13
Image Interlacing
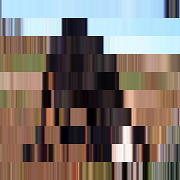 A horizontally-interlaced
image, after 3% of the data has been displayed.
A horizontally-interlaced
image, after 3% of the data has been displayed.
Let's say you were going to write an app that rendered a complex image one pixel at a time, and that rendering would take about, say, 10 seconds per image. Or lets say you were downloading a large image and it would take, say, 80 seconds to download the whole thing.
80 seconds in 2010, is equivalent to approximately 37 years in the year 12 BC, and is entirely an unacceptable amount of time to wait to see the whole image.
What can you do? You can interlace the image data. Instead of just producing the pixel data linearly left-to-right, top-to-bottom, you produce it out-of-order with big gaps, so that you get a representative subset of the final image first, draw that, then get another pass of data and use that to improve things further, then another pass, and so on until your image is complete. This enables you to draw a low-resolution version of the image after a very short amount of time, and then keep improving it over the course of the data generation (whether it's a download or a calculated image rendering).
Lots of image formats support interlacing, including GIF, JPEG, and PNG. Those three all do it differently.
A bit of a terminology snafu here: JPEG calls its interlaced images "progressive JPEGs", which is a little bit confusing because in the video world, "progressive" explicitly means "non-interlaced". ("Progressive" is the "p" in "720p".) For this post, I'm going to simply ignore the JPEG terminology.
Usually when you create the GIF, JPEG, or PNG, you tell the image writer if you want to interlace the image, and then the image viewer will later display it properly. So there's not much to talk about there.
But fortunately that's not where this story goes, or you'd likely be bored out of your mind.
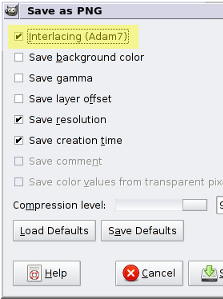 GIMP
asking me if I want to save this image as an interlaced image (using
Adam7 interlacing.)
GIMP
asking me if I want to save this image as an interlaced image (using
Adam7 interlacing.)
What if you are generating the image mathematically, using some process that takes a while (like ray-tracing, for instance)? It might be nice to display to the user a rough version of the image, and gradually improve it as time goes on. This way the user has an early opportunity to decide if they want to abort the render, instead of needing to wait a long time to see it finish.
(I use this to great effect in my other post about the Mandelbrot Set, in the Mandelbrot Set explorer app.)
So this is where you could implement your own interlacing scheme. But how should you do it? There are, as always, a multitude of different ways.
Maybe you could draw every other pixel in a checkerboard pattern, and then draw the remaining pixels. That would be a two-pass system, where the first pass would be complete after 50% of the data was generated.
That's not bad—the user would get to see the first complete rough version of the image in only half the time, versus generating the whole image in one pass.
But can you do better? What if you rendered every 4th horizontal line starting at line 0, then every 4th starting at line 1, then every 4th starting at line 2, then every 4th starting at line 3? You'd have a four-pass system, so the user would see the first rough image in only 25% the time of the original! Oooo...
Of course, looking at a series of horizontal lines can make it hard to see the original image. You can fake the parts you haven't rendered yet, by filling them with the colors you already have. So for the first pass, you'd render a "line" 4 pixels tall, then for the second pass, 3 pixels, and finally for the fourth pass, 1 pixel.
That's a pretty bad interpolation of the data, and there are better ways. It's definitely functional. Wait—is it interpolation or extrapolation? It's between two discrete values, like with interpolation, but it only uses one of them to generate the intermediate values. I'll go ahead and guess it's extrapolation and someone who is more mathy can correct me. Anyway, a real viewer might use interpolation or filters to make the initial passes of the image look even better, but for this demo, I don't do that.
 An animation from Wikipedia that shows
the pixel rendering order in an Adam7 interlaced image. The pass number
is printed in the upper left.
An animation from Wikipedia that shows
the pixel rendering order in an Adam7 interlaced image. The pass number
is printed in the upper left.
And rendering horizontal lines has the drawback that it favors vertical lines. That is, if you have vertical lines in your image, and you interpolate the data downward to the next horizontal line, you'll have an accurate image in one pass. But if you have horizontal lines in your image, maybe they don't even get rendered until the fourth pass, depending on where they fall. This is why PNG uses a two-dimensional interlacing scheme, known as "Adam7", to not particularly favor the directions of the lines in the final image.
The number of passes isn't necessarily as important as seeing how much of the data must be loaded before the image achieves some level of visual quality. What percentage of the image must be downloaded or generated before the image is useful? Do some interlacing techniques produce a useful image with fewer numbers of pixels?
With all this in mind, what follows is a toy program that demonstrates some different interlacing techniques.
So just go on down there and starting clicking "Next Pass" and see what happens. (People should place bets at this point as to what the image is.)
You can select whether or not intermediate rows are extrapolated (or whatever), by toggling the "Fill" button. (Sometimes it might be more useful for demonstration purposes to see the pixels being drawn individually.)
And you can select which interlacing method to use with the buttons on the right. I just made up names for the first three. "Blinds" (a usage of the term I've seen elsewhere) looks like Venetian blinds closing. "Y halving" draws a row of pixels, and then draws rows directly between those rows. "XY halving" does the same thing, except in two dimensions. (I just made up the terms "Y halving" and "XY halving", and they sound terrible, so if anyone knows what it's actually called, please comment.)
"Y halving (GIF)" is exactly what GIF uses; it's just like the "Y halving" mode, but is locked down to four passes, just like GIF does it.
Finally "Adam7 (PNG)" does Adam7 interlacing, just like PNG images do it.
Notice how the "Blinds" mode generates the same number of pixels on each pass. This is good because the image progresses smoothly and we have plenty of bail-out chances between passes, but is bad because it seems like we need to get 40-50% of the image loaded before we start getting a general feel for the shape.
Compare to "Y halving" which seems to give us a useful image at 6-12% of the data loaded—much sooner!
What about taking it into THE SECOND DIMENSION! With "XY halving", it looks like we're getting a useful image between 2-6% of the total data loaded. That's some impressive stuff. Compare it to "Blinds"—notice how "XY halving" generates very small amounts of data in the early passes, and saves the biggest chunk for last, while "Blinds" generates equal-sized chunks the whole way through.
What about Adam7 vs "XY halving"? Both result in the same image at 1600 pixels, but things progress a little differently from there. When only one pass remains, "XY halving" is only showing you 25% of the data, while Adam7 is showing you 50% of the data.
Mind you, both interlacing methods will take exactly the same amount of time to render or download (because they both eventually display the same final image). The question is, after 25% of the image has been generated, do you want to see another intermediate pass of incremental improvements (like with Adam7) or just load the rest of the data in one pass (like with "XY halving")?
Put another way, maybe 25% of the data is enough for you to make a "go/no-go" determination on the rest of the image. In that case, either Adam7 or "XY halving" work fine. Adam7 will load the rest of the data in two more passes, and "XY halving" will load the rest in one more pass.
But what if you need 50% of the data for your "go/no-go" because the image is that detailed? Adam7 will complete another pass to give you 50% of the data, before going to the last pass. But with "XY halving", only one pass remains, and you have no choice but to wait for all the data to load.
Adam7 is a compromise between a large number of evenly-spaced passes that give you plenty of chances to bail out (like with "Blinds"), and a quick initial image rendering (like with "XY halving").
Again, don't forget to try it with the "Fill" button off, just so you can see the actual pixels getting generated.
Later, I'll use one of these techniques in another blog entry, which is actually what inspired me to write this one in the first place.